Kit four – the valve gear (and the buffers)
Kit four in a series of 12 – Building a Polly Model Prairie Tank Locomotive
It’r fair to say this kit left me scratching my head. Lots of machined parts that required a fair bit of filing and cleaning with white spirit. A satisfying kit, with lots of mechanical parts.
I started the kit with a simple task cleaning up the buffer heads, they didn’t need much work. I locked the rods in place with LOCTITE, and then slowly turned then with an electric drill and fine wet/ dry paper. Bolted in pace, they looked the part.
The eccentrics needed a lot of de burring, sanding and filing to get all the parts to fit. A simple task that just took ages, well it seemed it. Once I was happy with the fit, I cleaned and “Blacked” the parts. Black-it is a rust protection solution, that eliminates the need for painting. I didn’t fancy painting these complex moving parts, I thought they could get fouled with paint on the spindles etc. I am very happy with the finish on the parts with Black-it, I will use it further in future kits. I wasn’t sure about how tight the parts should be, so I did them up tight. Only time will tell if they are too tight. My advice to anyone working on this kit is to study the instructions and the large diagrams; fitting these parts in the wrong direction could lead to damage.
This website and blog should be seen as information only, I will be document building the 12 kits, if you need expert advice, please contact Polly Model Engineering.
Need tools – tools I used are listed here…

Kit four
This is kit 4 of 12. This builds the buffer heads, and all the valve gear of the Polly Model Engineering Prairie Tank locomotive. This kit is not yet complete, so please check back to see my progress.
Materials
- Buffer heads, studs and springs,
- Suspension links,
- Trunion brackets,
- Complete rockers,
- Expansion links, die blocks and pins,
- Eccentric link rods
- Weight shaft, arm and lever
- Assorted bolts, pins and collars
Tools
- Help my website continue - Consider buying your equipment needs from my affiliate links, evry little helps, many thanks.
- Bahco 9770 BE-9770 1.5 - 10mm Hex Key Set
- Magnusson Hex Key Set 30 Pieces
- Bahco S290 Socket Set, Metric 1/4" Drive, 29 Pieces
- Bahco BH59/S100BC 100 Pcs Bit Set
- Bahco S240 1/2″ Drive 24 Piece Metric Socket Set 10 – 32mm
- 5 Piece Metric Combination Spanner Set, Mini/Small Sizes, 3.2mm, 3.5mm, 4.0mm, 5.0mm & 5.5mm
- Laser 7132 BA Spanner & Socket Set 1/4"D 17pc
- AojSup 17Pcs Metal File Set, Professional Files Tools
- AFA Tooling Deburring Tool Kit
- Draper 98521 Storm Force 230V Rotary Multi-Tool Kit, 135W
- White spirit, thinners and sandpaper for surface preparation
- Black-it kit 4 x 500ml bottles
- LOCTITE 603
- Steam Oil 1000 grade ½ litre
- Don’t have an Amazon account – Click here to sign up to Amazon using our affiliate link and help support my website.
Instructions
1. For starters, here is the usual kit of parts, all spread out for the world to observe.

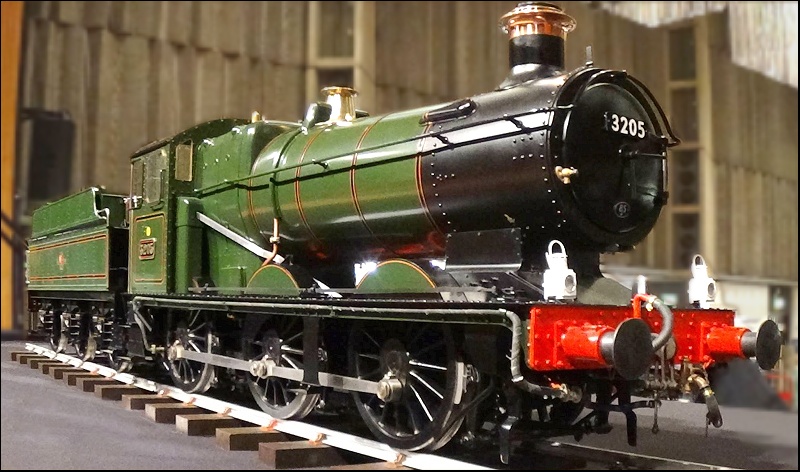
2. The first task was to clean up the buffer heads, I was looking forward to this kit as I felt these made the kit start to feel like a proper loco. Things now feel very technical.

3. I started by gluing the buffer studs to the buffer heads, a simple task that would make finishing the heads easier.

4. Once they had dried, I mounted them in my drill fixed in the vice. This meant I could use some wet/dry paper to improve their finish.

5. The picture shows after the buffer heads had taken a spin in the drill and polished up.

6. I then fitted them to the loco, a proud moment, it's starting to come together.

7. The rear view of the loco,

8. On to the valve gear, after a wash and slip with the file. These parts needed no more than a debur. In hindsight, I wish I had done this a little more, as my loco is very tight and stiff. A slider I’m told! Polly Model Engineering have seen it said it's normal and will be fine once it's been running for a while, so I am not worried.

9. A trial fit of the valve gear.

10. And the eccentric rods, looking clean and sharp. You will notice I have not put a split pin in to hold them in place, this was only a trial fit for now.

11. Once I was happy with everything, I disassembled everything. Rather than paint the parts, I decided to use "Black-it" From Polly Model Engineering. This stains the metal and makes it more resistant to rusting.

12. A very simple process, if not slightly time-consuming process. The did find it tricky to find a pot long enough to immerse the parts in to black them (not parts of this kit, future kits).

13. Just some of the parts as they pass through the chemical process baths.

14. The expansions links after they have been through the Black-It process, they are ready to be assembled into the loco frames.

15. The valve gear fitted to the frames


Notes
Recommended Products
I make no formal recommendation, I make no gain from this item what so ever, these links are provided for information only!