Kit three – More wheels (and the ponies, pump and motion)
Kit three in a series of 12 – Building a Polly Model Prairie Tank Locomotive
Just when I thought all filing of wheels was complete, more arrived in kit three. The wheels, axel pump and motion arms. The link from the wheels to the piston were out of stock so arrived within a future kit.
I started this kit where I left the last one, wheels. These wheels were a little trickier due to their size. Once I was happy with the finish on the spokes, I painted them. Last task was to build the pony, this was an easy assembly task using the Loctite supplied.
The axel pump cleaned up easily, sprayed with etch primer and then the red topcoat. I assembled it and installed it into the frames. The last task was to clean up the motion arms. These needed a lot of work to improve the finish; sand by hand, filing and very careful use of the electric multi tool. The effort I put in really paid off as they look much better for it and work well.
This website and blog should be seen as information only, I will be document building the 12 kits, if you need expert advice, please contact Polly Model Engineering.
Need tools – tools I used are listed here…
Kit three
This is kit 3 of 12. This builds the coupling rod, 2 pony trucks and the axel driven water pump on the Polly Model Engineering Prairie Tank locomotive. This kit is not yet complete, so please check back to see my progress.
Materials
- Axle pump
- Banjo's and bolts
- Ram and o'Rings
- Axle pump eccentrics
- Coupling rods
- Crank pin caps
- Oilers (Pre fitted)
- Coupling chain and links
- 4 Pony wheels
- 2 Axels
- 2 Spring brackets
- 2 Axel brackets
- Springs and spring rods
- 2 Pony frames
- 2 vertical springs
- Top nut and sliding nut
- Cow horn fittings
Tools
- Help my website continue - Consider buying your equipment needs from my affiliate links, evry little helps, many thanks.
- Bahco 9770 BE-9770 1.5 - 10mm Hex Key Set
- Magnusson Hex Key Set 30 Pieces
- Bahco S290 Socket Set, Metric 1/4" Drive, 29 Pieces
- Bahco BH59/S100BC 100 Pcs Bit Set
- Bahco S240 1/2″ Drive 24 Piece Metric Socket Set 10 – 32mm
- 5 Piece Metric Combination Spanner Set, Mini/Small Sizes, 3.2mm, 3.5mm, 4.0mm, 5.0mm & 5.5mm
- Laser 7132 BA Spanner & Socket Set 1/4"D 17pc
- AojSup 17Pcs Metal File Set, Professional Files Tools
- AFA Tooling Deburring Tool Kit
- Draper 98521 Storm Force 230V Rotary Multi-Tool Kit, 135W
- White spirit, thinners and sandpaper for surface preparation
- Black-it kit 4 x 500ml bottles
- LOCTITE 603
- Steam Oil 1000 grade ½ litre
- Don’t have an Amazon account – Click here to sign up to Amazon using our affiliate link and help support my website.
Instructions
1. Picture 1 shows all the parts laid out for the pony truck. There are two pony trucks on this loco, the only difference is the top nut design.

2. Picture 2 shows all the parts laid out for the conecting rods and the axle driven pump.

3. Picture 3 shows the axle driven pump in place. It did not need much attention to clean it up. I sprayed it with etch primer and then a top coat of red. The ram and the pump eccentric did require a fair amount of finishing with a motor tool, this was needed to ensure that the eccentric fitted inside the pump ram and moved easily. The only pictures i have of this is with the pump and ram fitted.

4. The wheels for the ponies did require a fair amout of cleaning. As with the main wheets, they dont need to be perfect. This was only tricky because the space for a file was quite small, i managed to find a set of small files. I opted to clean them up mostely by had, as the risk of catch and scratching or taking to much of the wheels was too great.

5. The pony frames, axel bracket and spring bracket needed a small amount of cleaning. All items were sprayed with etch primer prior to the top coat and assembly.

6. This image shows the fitted cow horns.

7. Assembly of the pony truck was reasonably simple, maybe just a little tricky to align parts up.

8. Glue the wheels together, follow the instructions on the supplied bottle of adhesive. (Loctite 603)

9. I have included this image as a reminder to follow the instructions and chec the the orientation of the pony pivot block, i hadf it the wrong way. THis meant that the pony frame did not quite line up.. it was easily fixed by turning the pony pivot block around. It did slight damage to the paint work on the frames.

10. The next two images show the work involved to clean up the link rods. Tho a lot of work, a motor tool and lots of wet and dry paper made for a very satisfying finish.


11. As you can see in this image, they clean up well.

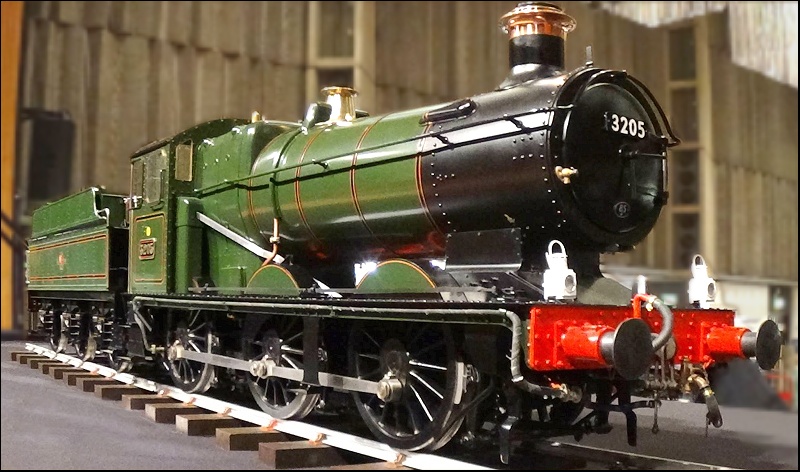
12. The last image sows the guide arems in place, ready ti be fitted to the cylinder. Do take care to follow the instructions with regard to fitting the wheels the correct way around. The wheels were a chalenge to fit. I trie different ways to do this. I opted to fit the wheels in the frames and then press down on the frames while tightening the spring retainers. I then flipped it over and bolted the axle keeps in place.

Notes
This kit has been the most enjoyable so far, just ensure the rotation of the pony pivit and the wheels, or things wont be smooth.
Recommended Products
I make no formal recommendation, I make no gain from this item what so ever, these links are provided for information only!